继续完成SDK的NotePad例子,之前说过整个例子的功能大致分为:
1. 便签(Note)列表的显示; 2. 便签内容的编辑与查看,删除;
3. 便签标题的编辑;
4. 便签程序的实时文件夹(桌面快捷方式的建立)
【更新】源码免费下载地址:android SDK 下NotePad例子详解源码
我们上篇博客走到了第二步,下面开始第三步功能的实现
三、便签标题的编辑
便签这块的表结构之前上篇博客也经看到,note表中有title这个字段
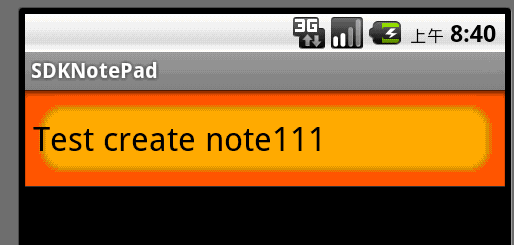
 而我们需要的操作就是,针对某一个note我们能够编辑其title的功能,效果图:


Title修改之后,在列表中得效果图:
通过上述流程,大致就能看出我们完成模块功能的关键点,
1. 需要动态的添加菜单项
实现这个功能,还是要回到,NoteEditor这个类中
public boolean onCreateOptionsMenu(Menu menu) {
        super.onCreateOptionsMenu(menu);
        Log.i(TAG, "Enter in NoteEditor的onCreateOptionsMenu方法");
        // Build the menus that are shown when editing.
        if (mState == STATE_EDIT) {
            menu.add(0, REVERT_ID, 0, R.string.menu_revert)
                    .setShortcut('0', 'r')
                    .setIcon(android.R.drawable.ic_menu_revert);
            if (!mNoteOnly) {
                menu.add(0, DELETE_ID, 0, R.string.menu_delete)
                        .setShortcut('1', 'd')
                        .setIcon(android.R.drawable.ic_menu_delete);
            }

        // Build the menus that are shown when inserting.
        } else {
            menu.add(0, DISCARD_ID, 0, R.string.menu_discard)
                    .setShortcut('0', 'd')
                    .setIcon(android.R.drawable.ic_menu_delete);
        }

        //【注意】这里就是我们刚刚添加,使用动态的方法出创建菜单项
        if (!mNoteOnly) {
            Intent intent = new Intent(null, getIntent().getData());
            intent.addCategory(Intent.CATEGORY_ALTERNATIVE);
            menu.addIntentOptions(Menu.CATEGORY_ALTERNATIVE, 0, 0,
                    new ComponentName(this, NoteEditor.class), null, intent, 0, null);
        }
        return true;
}
会按照Intent.CATEGORY_ALTERNATIVE到inter-filter里面找符合条件的activity来完成操作
就会找到TitleEditor这个activity:
<activity android:name="TitleEditor" android:label="@string/title_edit_title"
            android:theme="@android:style/Theme.Dialog" android:windowSoftInputMode="stateVisible">
            <!-- This activity implements an alternative action that can be
                 performed on notes: editing their title.  It can be used as
                 a default operation if the user invokes this action, and is
                 available as an alternative action for any note data. -->
            <intent-filter android:label="@string/resolve_title">
                <!-- This is the action we perform.  It is a custom action we
                     define for our application, not a generic VIEW or EDIT
                     action since we are not a general note viewer/editor. -->
                <action android:name="com.android.notepad.action.EDIT_TITLE" />
                <!-- DEFAULT: execute if being directly invoked. -->
                <category android:name="android.intent.category.DEFAULT" />
                <!-- ALTERNATIVE: show as an alternative action when the user is working with this type of data. -->
                <category android:name="android.intent.category.ALTERNATIVE" />
                <!-- SELECTED_ALTERNATIVE: show as an alternative action the user can perform when selecting this type of data. -->
                <category android:name="android.intent.category.SELECTED_ALTERNATIVE" />
                <!-- This is the data type we operate on. -->
                <data android:mimeType="vnd.android.cursor.item/vnd.google.note" />
            </intent-filter>
        </activity>
【需要注意】:
注意这里就会产生一个问题,效果中menuItem的菜单项如何显示,即如何找到我们对于string里的常量的,
经过测试后,发现它会默认先找:
<intent-filter android:label="@string/resolve_title">
这个label标签,找不到的话,就会往上找, <activity android:name="TitleEditor" android:label="@string/title_edit_title"
就会找到这个activity的label显示
测试效果图:左图就是intent-filter有android:label这个属性时,右图就是注释掉intent-filter有android:label这个属性效果。


2. 完成对弹出title内容的修改
这个应该比较过程应该比较属性了
/**
 * 本activity用来编辑便签标题,显示一个包含EditText的浮动窗口
 */
public class TitleEditor extends Activity implements OnClickListener {
	private static final String TAG = "TitleEditor";

	 /**
	  * 一个特定的intent Action来标示 编辑便签标题操作
     */
    public static final String EDIT_TITLE_ACTION = "com.android.notepad.action.EDIT_TITLE";

    /**
     * 我们需要操作的notes表的两个字段,由于后面查询使用
     */
    private static final String[] PROJECTION = new String[] {
            NotePad.Notes._ID, // 0
            NotePad.Notes.TITLE, // 1
    };

    /** title列在note表的的第二列,获取时列的index为1 */
    private static final int COLUMN_INDEX_TITLE = 1;

    private Cursor mCursor;

    private EditText mText;

    private Uri mUri;

    @Override
    public void onCreate(Bundle savedInstanceState) {
        super.onCreate(savedInstanceState);
        Log.i(TAG, "Enter in TitleEditor的onCreate方法");

        setContentView(R.layout.title_editor);

        mUri = getIntent().getData();//获取我们准备编辑title的note记录的uri

        mCursor = managedQuery(mUri, PROJECTION, null, null, null);	//获取该note的cursor

        //设置该EditText与Button控件的 事件的监听
        mText = (EditText) this.findViewById(R.id.title);
        mText.setOnClickListener(this);
        Button b = (Button) findViewById(R.id.ok);
        b.setOnClickListener(this);
    }

    @Override
    protected void onResume() {
        super.onResume();
        Log.i(TAG, "Enter in TitleEditor的onResume方法");
        // Initialize the text with the title column from the cursor
        if (mCursor != null) {
            mCursor.moveToFirst();
            mText.setText(mCursor.getString(COLUMN_INDEX_TITLE));
        }
    }

    @Override
    protected void onPause() {
        super.onPause();
        Log.i(TAG, "Enter in TitleEditor的onPause方法");
        if (mCursor != null) {
            // Write the title back to the note
            ContentValues values = new ContentValues();
            values.put(Notes.TITLE, mText.getText().toString());
            getContentResolver().update(mUri, values, null, null);
        }
    }

    public void onClick(View v) {
        // 当用户触发点击事件是,就会结束该activity,这时onPause方法就会调用,保持当前的数据
        finish();
    }

}
四、便签程序的实时文件夹(桌面快捷方式的建立)
这个效果很炫,自己之前刚买智能手机时还不会用呢,后来才发现这个效果非常实用与方便,目的就是在能够快速读取我们程序的数据信息。大家用过肯定知道,长时间按着屏幕就会弹出相应快捷方式的设置
效果图:由左至右

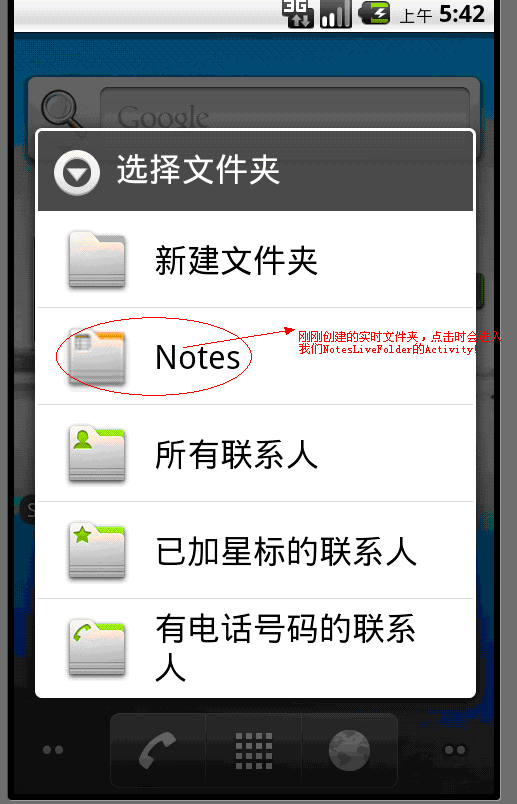

分析:要想实现这个效果,我们也要有相应的activity来实现:相应的解释在源码中都有,应该很好理解。
public class NotesLiveFolder extends Activity {
	/**
     * The URI for the Notes Live Folder content provider.
     */
    public static final Uri CONTENT_URI = Uri.parse("content://" + NotePad.AUTHORITY + "/live_folders/notes");

    public static final Uri NOTE_URI = Uri.parse("content://" + NotePad.AUTHORITY + "/notes/#");

    @Override
    protected void onCreate(Bundle savedInstanceState) {
        super.onCreate(savedInstanceState);

        final Intent intent = getIntent();
        final String action = intent.getAction();

        //判断是否创建实时文件夹
        if (LiveFolders.ACTION_CREATE_LIVE_FOLDER.equals(action)) {
            //设置数据地址
            final Intent liveFolderIntent = new Intent();

            liveFolderIntent.setData(CONTENT_URI);
            //设置实时文件夹的名字,即是快捷方式的标题
            liveFolderIntent.putExtra(LiveFolders.EXTRA_LIVE_FOLDER_NAME, getString(R.string.live_folder_name));

         	//设置实施文件夹的图标
            liveFolderIntent.putExtra(LiveFolders.EXTRA_LIVE_FOLDER_ICON, Intent.ShortcutIconResource.fromContext(this, R.drawable.live_folder_notes));
            //设置显示模式为列表
            liveFolderIntent.putExtra(LiveFolders.EXTRA_LIVE_FOLDER_DISPLAY_MODE, LiveFolders.DISPLAY_MODE_LIST);
            //设置单击之后的事件,这里是单击其中一条便签时
            liveFolderIntent.putExtra(LiveFolders.EXTRA_LIVE_FOLDER_BASE_INTENT, new Intent(Intent.ACTION_EDIT, NOTE_URI));

            // The result of this activity should be a live folder intent.
            setResult(RESULT_OK, liveFolderIntent);
        } else {
            setResult(RESULT_CANCELED);
        }

        finish();
    }
}
同时还有一个比较关键的配置是:
<!-- 用户在桌面上长按后选择实时文件夹就会弹出一个可用实时文件夹的列表对话框。若我们想把自己应用程序内的Activity也添加到这一列表中,
        	同样只需要在该Activity注册时添加一个Action为android.intent.action.CREATE_LIVE_FOLDER的IntentFilter。 -->
        <activity android:name="NotesLiveFolder" android:label="@string/live_folder_name"
            android:icon="@drawable/live_folder_notes">
            <intent-filter>
                <action android:name="android.intent.action.CREATE_LIVE_FOLDER" />
                <category android:name="android.intent.category.DEFAULT" />
            </intent-filter>
        </activity>
【需要注意】:
1.上面第二个效果图中,在点击列表图标时才会触发NotesLiveFolder这个Activity,
列表中该程序是否显示是由配置文件决定的,可以参考上面配置代码。
2.
liveFolderIntent.putExtra(LiveFolders.EXTRA_LIVE_FOLDER_NAME, getString(R.string.live_folder_name));
改为:
liveFolderIntent.putExtra(LiveFolders.EXTRA_LIVE_FOLDER_NAME, "实时的NotePad");
效果图:

到此整个NotePad例子的功能就已经完全实现,呵呵,通过学习真的巩固了不少之前的知识,加油,继续努力!
分享到:


相关推荐
android SDK 下 NotePad例子详解 自己结合博客对例子进行了分析
安卓Android源码——NotePad便签.zip
4、Notepad++_安装
The list below provides a summary of the sample applications that are available with the Android SDK. Using the links on this page, you can view the source files of the sample applications in your ...
NULL 博文链接:https://trylovecatch.iteye.com/blog/1178999
android SDK1.6 eclipse Notepad 记事本 源码 Notepad android 记事本 源码
python项目 —— notepad-editor
AndroidLogger是Notepad++的一个查看android log的插件,不过由于近期插件没有更新,而自己使用的NDP7.6已经是64位版本了,不能再直接使用了。于是找来源码重新发布了64位版本,希望能有所帮助。
带Androidlogger插件的notepad++,直接下载解压,可用直接使用
notepad++日志分析插件.zip
• Optionally create rich-text notes using Markdown or HTML (Android 5.0 ) • Beautiful, easy-to-use UI with Material Design elements • Dual-pane view for tablets • Share notes to and receive text ...
Notepad++ 插件,AndroidLogger.V1.2.7. 可以让安卓日志自动显示颜色,告别白色背景 黑色字体!确保 打开的文件是.log后缀的。
android入门Notepad+源代码.rar,很好的入门源码,里面有详细的中文解释,或许能帮倒你
本资源为android版的notepad的源码。想学习android应用程序的朋友可以参考一下。
AndroidLogger——MGYH.zip
android自定义View之NotePad出鞘记,自定义NotePad,android自定义笔记本
2. AndroidKiller是一个集成工具箱(apktools等都在里面)【分析和修改smali代码】 3. Jadx-gui 可以将apk直接反编译为Java代码,但是不能查看。 4. WinHex 由于IDA多用于分析,该软件用来修改对应的二进制。 5. ...
注:该文件名为notepad2.exe。按照网上的说法,更名为notepad.exe,然后通过PE替换系统目录内的notepad,本人试过好几次(win7 X64),均提示为系统文件无法替换之类。懂的同学可以自行研究。 另:有简单的方法,在...
记事本 NotePad android sdk notepad(源码)
Android 4.0 Notepad源代码,该代码为Android 4.0系统便签源代码。